10 Flutter自定义裁剪
1 flutter的自定义裁剪是如何实现的?
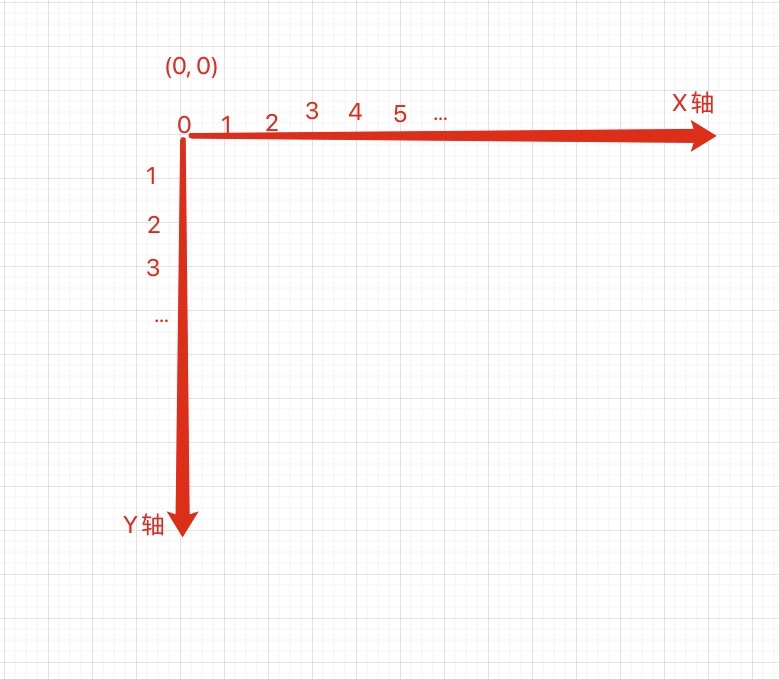
flutter会假想出一个X和Y轴的坐标网格。而这个坐标的起始点也就是Y和X轴都是(x,y) = (0,0)的起始点是在左上角位置,如图:
1.1 先固定一个初始点,这时的画面上什么都没有代码如:
先设置起始的坐标点
import 'package:flutter/material.dart';
class DailyCaloriesTitleView extends StatelessWidget {
const DailyCaloriesTitleView({Key? key}) : super(key: key);
Widget build(BuildContext context) {
double btnWidth = 200;
return SizedBox(
width: btnWidth,
child: ClipPath(
clipper: TrapezoidPath(),
child: Container(
width: btnWidth,
height: 77,
alignment: Alignment.center,
decoration: const BoxDecoration(color: Colors.red),
child: const Text(
'Clipper',
style: TextStyle(
fontSize: 26,
fontWeight: FontWeight.bold,
color: Colors.white,
),
),
),
),
);
}
}
class TrapezoidPath extends CustomClipper<Path> {
Path getClip(Size size) {
double x = size.width;
double y = size.height;
var path = Path();
double skewing = 25;
path.moveTo(skewing, y); // step 1: 选择一个点
return path;
}
bool shouldReclip(CustomClipper<Path> oldClipper) {
return true;
}
}
代码中的moveTo方法会移动初始点到(x-25, y),的位置上。大概如何下方图片所示:
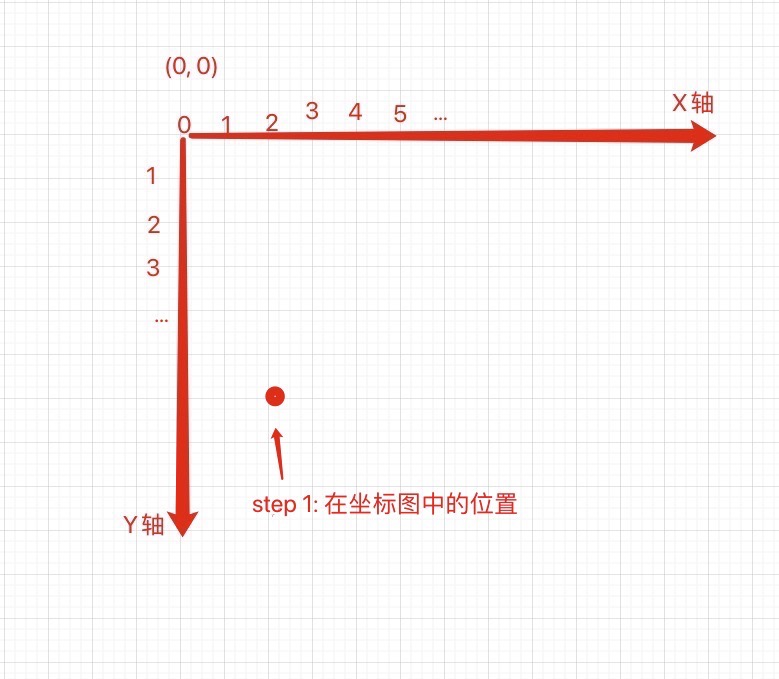
此时在视图中是什么东西没有显示,因为只有一个点而已。
1.2 添加新的坐标点(0,0), 代码如下:
// ...
Path getClip(Size size) {
    double x = size.width;
    double y = size.height;
    var path = Path();
    double skewing = 25;
    path.moveTo(skewing, y); // step 1: 选择一个点
    path.lineTo(0, 0); // step 2: 添添加第2个坐标点

    return path;
}
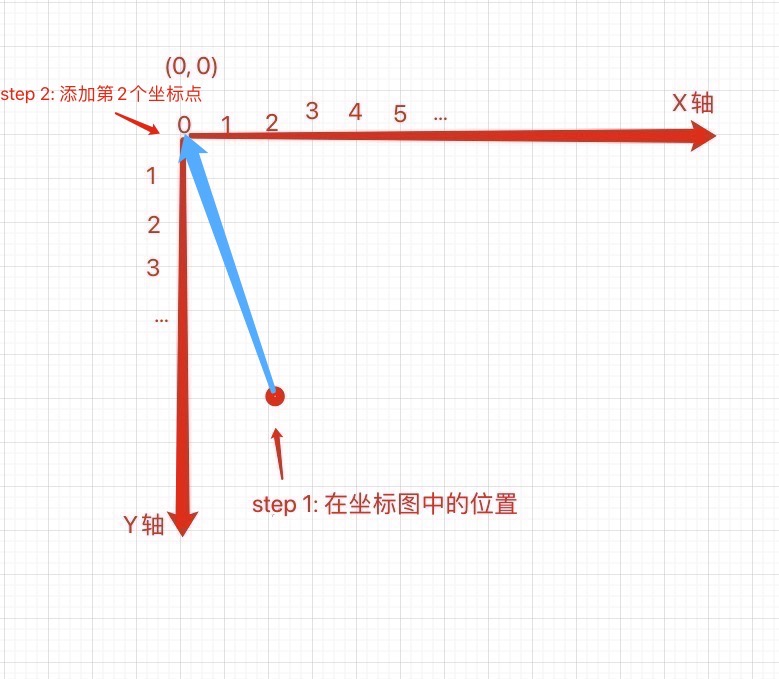
此时还是什么都没有显示,因为只有2个坐标,形成了一条线没有宽度和面积的线而已。
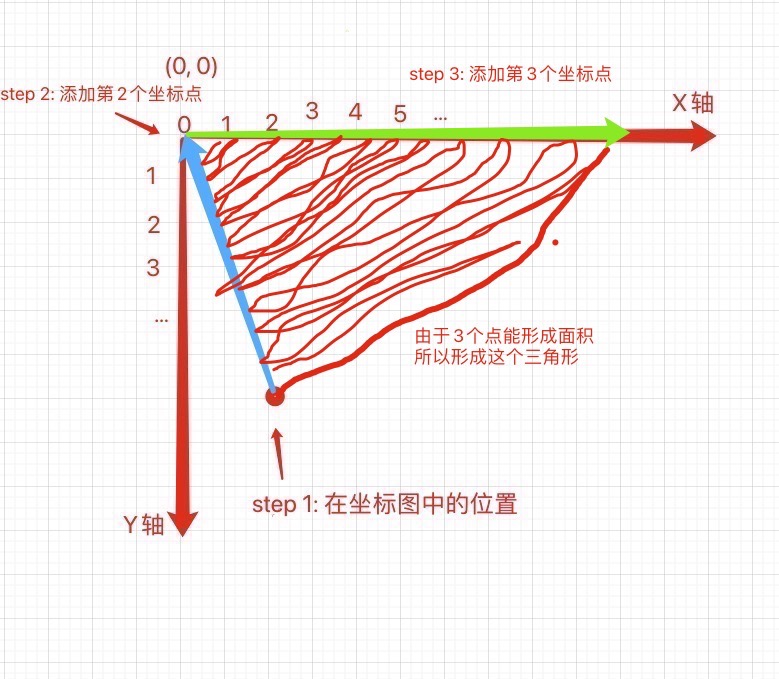
1.3 添加新的坐标点(x,0), 代码如下:
// ...
Path getClip(Size size) {
double x = size.width;
double y = size.height;
var path = Path();
double skewing = 25;
path.moveTo(skewing, y); // step 1: 选择一个点
path.lineTo(0, 0); // step 2: 添加坐标(0, 0)
path.lineTo(x, 0); // step 3: 添加坐标(x, 0)
return path;
}
// ...
- 坐标原理图
- flutter效果图

1.4 添置第4个坐标点,形成四边形
示例代码:
class TrapezoidPath extends CustomClipper<Path> {
Path getClip(Size size) {
double x = size.width;
double y = size.height;
var path = Path();
double skewing = 25;
path.moveTo(skewing, y); // step 1: 选择一个点
path.lineTo(0, 0); // step 2: 添加坐标(0, 0)
path.lineTo(x, 0); // step 3: 添加坐标(x, 0)
path.lineTo(x - skewing, y); // step 4: 添置第4个坐标点,形成四边形
path.close();
return path;
}
bool shouldReclip(CustomClipper<Path> oldClipper) {
return true;
}
}
最终由4个坐标点相连接,形成了一个4边四的梯形。
- 坐标原理图
- flutter效果图


最终完整示例代码
1import 'package:flutter/material.dart';23class DailyCaloriesTitleView extends StatelessWidget {4 const DailyCaloriesTitleView({Key? key}) : super(key: key);56 @override7 Widget build(BuildContext context) {8 double btnWidth = 200;9 return SizedBox(10 width: btnWidth,11 child: ClipPath(12 clipper: TrapezoidPath(),13 child: Container(14 width: btnWidth,15 height: 77,16 alignment: Alignment.center,17 decoration: const BoxDecoration(color: Colors.red),18 child: const Text(19 'Clipper',20 style: TextStyle(21 fontSize: 26,22 fontWeight: FontWeight.bold,23 color: Colors.white,24 ),25 ),26 ),27 ),28 );29 }30}3132class TrapezoidPath extends CustomClipper<Path> {33 @override34 Path getClip(Size size) {35 double x = size.width;36 double y = size.height;37 var path = Path();38 double skewing = 25;39 path.moveTo(skewing, y); // step 1: 选择一个点40 path.lineTo(0, 0); // step 2: 添加坐标(0, 0)41 path.lineTo(x, 0); // step 3: 添加坐标(x, 0)42 path.lineTo(x - skewing, y); // step 4: 添置第4个坐标点,形成四边形43 path.close();4445 return path;46 }4748 @override49 bool shouldReclip(CustomClipper<Path> oldClipper) {50 return true;51 }52}
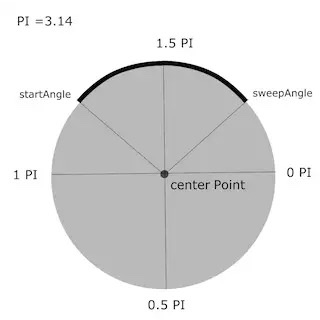
2 flutter弧度裁剪
弧度裁剪是通过arcTo方法来实现的。如:
/**
 * @Rect rect 指定了坐标的开始位置和结束位置
 * @double startAngle 开始的圆周率Pi的开始位置
 * @double sweepAngle 结束的圆周率跨越角度
 * @bool forceMoveTo 顺时钟方向或反之
 */
void arcTo(Rect rect, double startAngle, double sweepAngle, bool forceMoveTo);
效果如下:
裁剪的方式根据坐标的选择又分为以下4种:
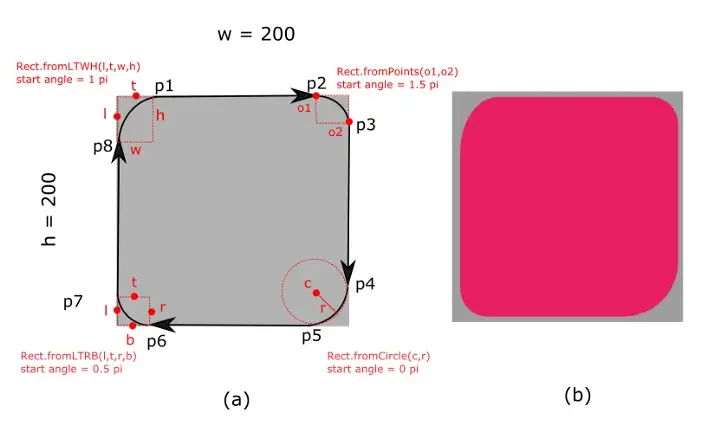
2.1 fromPoint方式裁剪方式
import 'dart:math';
import 'package:flutter/material.dart';
import 'package:hexcolor/hexcolor.dart';
class DailyCaloriesTitleView extends StatelessWidget {
const DailyCaloriesTitleView({Key? key}) : super(key: key);
Widget build(BuildContext context) {
Color primaryColor = Theme.of(context).primaryColor;
double btnWidth = 200;
return SizedBox(
width: btnWidth,
child: ClipPath(
clipper: TrapezoidPath(),
child: Container(
width: btnWidth,
height: 47,
alignment: Alignment.center,
decoration: BoxDecoration(
gradient: LinearGradient(
begin: Alignment.topCenter,
end: Alignment.bottomCenter,
colors: [
HexColor('#43E091'),
primaryColor,
],
),
),
child: const Text(
'Clipper',
style: TextStyle(
fontSize: 26,
fontWeight: FontWeight.bold,
color: Colors.white,
),
),
),
),
);
}
}
class TrapezoidPath extends CustomClipper<Path> {
Path getClip(Size size) {
double radius = 5;
double offset = 20;
Path path = Path()
..lineTo(size.width - radius, 0)
..arcTo(
Rect.fromPoints(
Offset(size.width - radius, 0),
Offset(
size.width,
radius,
),
), // Rect
1.5 * pi, // Start engle
0.5 * pi, // Sweep engle
true,
) // direction clockwise
..lineTo(size.width - offset, size.height - radius)
..arcTo(
Rect.fromPoints(
Offset(size.width - offset, size.height - radius),
Offset(size.width - offset - radius, size.height),
),
.5,
0.5 * pi,
false,
)
..lineTo(radius + offset, size.height)
..arcTo(
Rect.fromPoints(
Offset(radius + offset, size.height),
Offset(offset, size.height - radius),
),
0.5 * pi,
0.5 * pi,
false,
)
..lineTo(0, radius)
..arcTo(
Rect.fromPoints(
Offset(0, radius),
Offset(
radius,
0,
),
), // Rect
1 * pi,
0.5 * pi,
false,
)
..close();
return path;
}
bool shouldReclip(CustomClipper<Path> oldClipper) {
return true;
}
}
